Line Following Buggy Code
In this project we learn how to code our buggy to follow a course made from a dark line on a large white sheet of paper.
To start with we need to know how the buggy works.

1. How does it work?
Motors
The two motors are quite simple. They are connected by two wires to a power source such as a set of batteries.
When the power is turned on, the motor turns. If the power source is connected the other way, the motor runs in reverse. You can also force the motor to stop (brake). This means that each motor can be in four possible states:
- Coast (no current)
- Forward (current turned on)
- Back (current turned on in reverse)
- Brake (current shorted)
Motor Driver Board
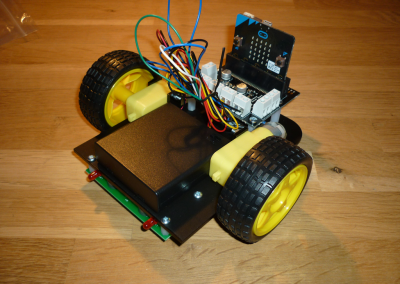
It would be very hard to control the motors by turning each one on and off and swapping the wires around by hand. The motor driver board does this for us.
The power from the battery pack is connected to the board and the board connects to both motors. The board can arrange for power to go to one or both motors, and in either direction. It takes its instructions from the micro:bit which plugs into the board.

micro:bit
The micro:bit has a set of connectors (also called pins) on its edge connector. You can see 5 main pins, labelled 0, 1, 2, 3V and GND. If you look closer, you can see more, smaller pins in between. These pins connect to the motor driver board when we plug it in.
In our code we can alter the state of these pins, a bit like turning them on and off. In this way we communicate with the driver board and tell it what to do with the motors:
- To turn a pin ON we set it to 1
- To turn a pin OFF we set it to 0
We need to know which pin does what so that we can program the correct ones.

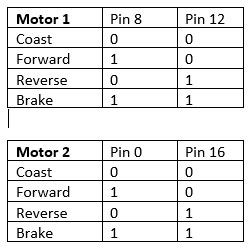
These are the pins that affect the motors:
Looking back at our code, we can see where we use these:
# Set both motors to forward
pin8.write_digital(0)
pin12.write_digital(1)
pin0.write_digital(0)
pin16.write_digital(1)
For example, pin8.write_digital(0) means: set Pin1 OFF
We then need to pause to let the motors run for a length of time (in milliseconds):
# Run the motors for 3 seconds (5000 milliseconds)
sleep(3000)
We can also read information from the pins, which we’ll use to detect the dark lines on the course later in the project.

Complete code for the line-following buggy. You’ll need a suitable course for the buggy which you can create using a large sheet of white paper and black tape or marker pen.
# buggy-line.py
# Buggy line following code

# Import microbit libraries
from microbit import *

# Time to run motors for each change of direction (milliseconds)
run_time = 15
turn_time = 15
spin_time = 15
coast_time = 30

# Stops the buggy motors (brake)
def buggy_stop():
    display.show(Image.ASLEEP)

    # Stop motors
    pin8.write_digital(1)
    pin12.write_digital(1)
    pin0.write_digital(1)
    pin16.write_digital(1)

    return


# Coasts the buggy motors to a stop
def buggy_coast():
    # Coast motors
    pin8.write_digital(0)
    pin12.write_digital(0)
    pin0.write_digital(0)
    pin16.write_digital(0)

    sleep(coast_time)

    return


# Moves the buggy in a set direction for a number of seconds
# direction (string): one of 'forward' or 'back'
# time (number): time in
def buggy_move(direction, time):
    if direction == 'forward':
        # Show up arrow
        display.show(Image.ARROW_N)

        # Run both motors forward
        pin8.write_digital(0)
        pin12.write_digital(1)
        pin0.write_digital(0)
        pin16.write_digital(1)

    elif direction == 'back':
        # Show back arrow
        display.show(Image.ARROW_S)

        # Reverse motors
        pin8.write_digital(1)
        pin12.write_digital(0)
        pin0.write_digital(1)
        pin16.write_digital(0)

    sleep(run_time)

    # Coast motors
    buggy_coast()

    return

# Turns the buggy in a set direction for a number of seconds
# direction (string): one of 'right' or 'left'
# time (number): time in seconds
def buggy_turn(direction, time):

    if direction == 'right':
        # Show right arrow
        display.show(Image.ARROW_NE)

        # Run left motor only
        pin8.write_digital(0)
        pin12.write_digital(1)
        pin0.write_digital(0)
        pin16.write_digital(0)

    elif direction == 'left':
        # Show left arrow
        display.show(Image.ARROW_NW)

        # Run right motor only
        pin8.write_digital(0)
        pin12.write_digital(0)
        pin0.write_digital(0)
        pin16.write_digital(1)

    sleep(time)

    # Coast motors
    buggy_coast()

    return


# Spins the buggy in a set direction for a number of seconds
# direction (string): one of 'right' or 'left'
# time (number): time in secondsback
def buggy_spin(direction, time):

    if direction == 'right':
        # Show right arrow
        display.show(Image.ARROW_E)

        # Run left motor forward, right motor back
        pin8.write_digital(0)
        pin12.write_digital(1)
        pin0.write_digital(1)
        pin16.write_digital(0)

    elif direction == 'left':
        # Show left arrow
        display.show(Image.ARROW_W)

        # Run right motor forward, left motor back
        pin8.write_digital(1)
        pin12.write_digital(0)
        pin0.write_digital(0)
        pin16.write_digital(1)

    sleep(time)

    # Coast motors
    buggy_coast()

    return


# Wait for button press
def button_wait():
    button_press = False
    while not button_press:
        if button_a.is_pressed() or button_b.is_pressed():
            button_press = True

    # Let user remove finger from button
    sleep(1000)

    return


# Main code – start by waiting for a button to be pressed
button_wait()


# Run until a button is pressed
button_press = False
while not button_press:

    # Check the light detectors on Ppins 0 and 1
    # Pins go high (set to 1) when the dark area is detected
    p1 = pin1.read_digital()
    p2 = pin2.read_digital()

    if p1 == p2:
        # Straight on
        buggy_move('forward', run_time)
    elif p1 == 1 and p2 == 0:
        # Left dark, go left
        buggy_spin('left', turn_time)
        buggy_turn('left', turn_time)
    elif p1 == 0 and p2 == 1:
        # Right dark, go right
        buggy_spin('right', turn_time)
        buggy_turn('right', turn_time)

    # Check for button press to stop
    if button_a.is_pressed() or button_b.is_pressed():
        button_press = True

# Button pressed so stop
buggy_stop()

# The End


