Soil Moisture Sensor for micro:bit
This project uses a moisture sensor to create a simple device to warn when soil becomes too dry.
Language: MicroPython
Concepts: displaying images; using digital & analogue pins
Requires:
- BBC micro:bit
- YL-38 YL-69 moisture sensor
- Connecting wires
Optional:
- Prototyping breadboard
<iframe style="width:120px;height:240px;" marginwidth="0" marginheight="0" scrolling="no" frameborder="0" src="//ws-eu.amazon-adsystem.com/widgets/q?ServiceVersion=20070822&OneJS=1&Operation=GetAdHtml&MarketPlace=GB&source=ac&ref=tf_til&ad_type=product_link&tracking_id=quokkaz-21&marketplace=amazon®ion=GB&placement=B06XCLCM7H&asins=B06XCLCM7H&linkId=c946d7c3080a09c89dce45fd6840c489&show_border=true&link_opens_in_new_window=true&price_color=333333&title_color=0066c0&bg_color=ffffff"><!-- [et_pb_line_break_holder] --> </iframe>
Step by Step Instructions
Step 1
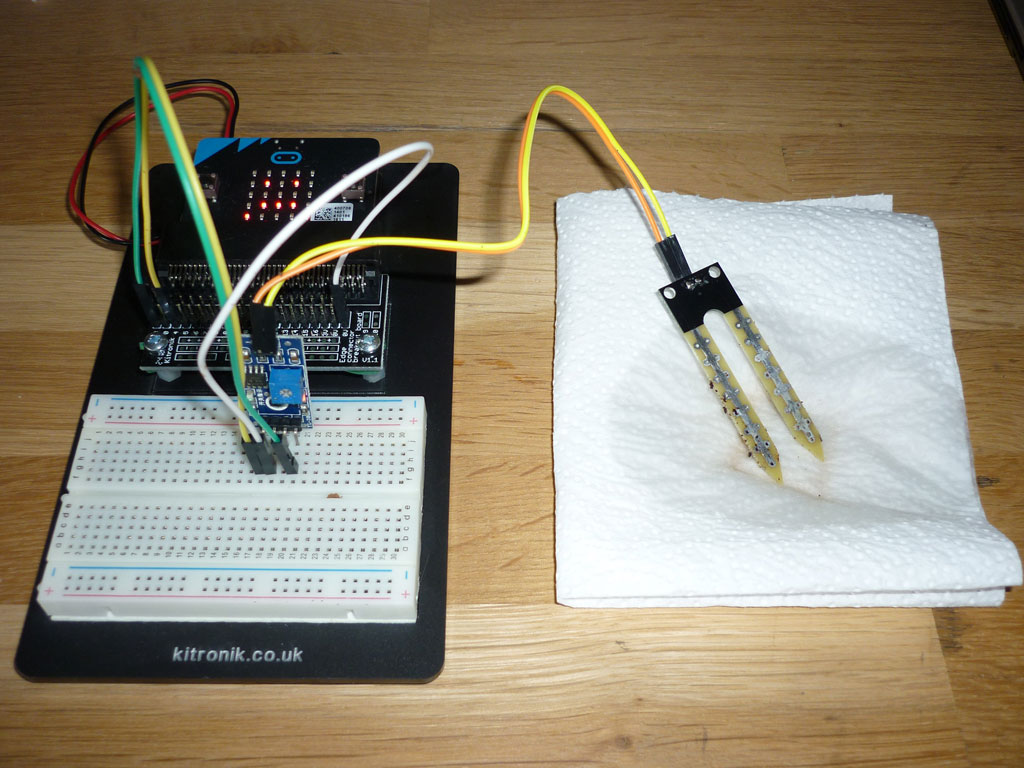
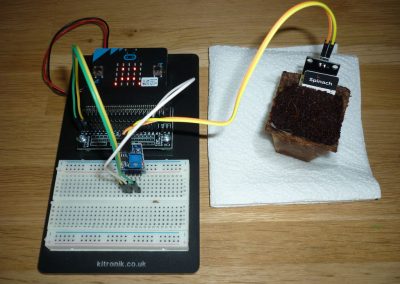
- Connect the two pins on the YL-69 probe to the connectors at the top of the YL-38 module board.
Notes
It doesn’t matter which way you make these connections.
Step 2
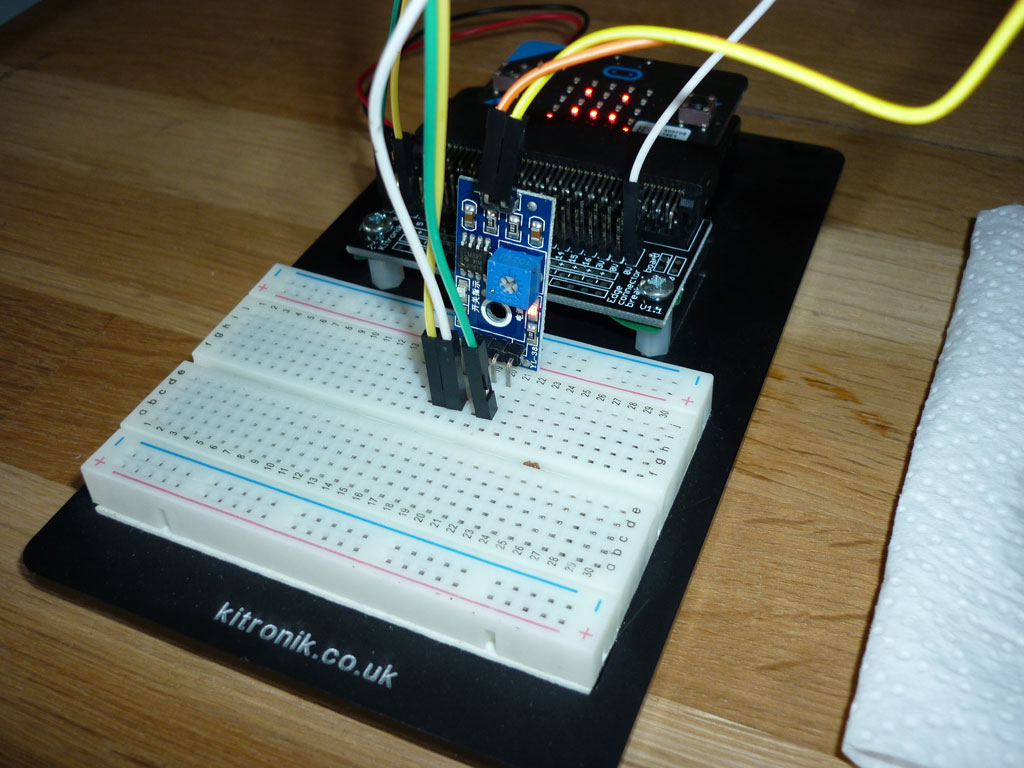
- Connect GND (0V) on the micro:bit to GND on the YL-38
- Connect PIN 2 on the micro:bit to Vcc on the YL-38
- Connect PIN 3 on the micro:bit to A0 on the YL-38
Notes
PIN 2 is used to turn on the circuit so that a reading can be taken.
PIN 3 is used to read the analogue signal from the sensor. This is a voltage that is high when the moisture content is low and lower when the moisture content is high.
Step 3
- Using your preferred editor, type or copy/paste the code and flash to the micro:bit.
Code
from microbit import *

# sensor reading above which the soil needs watering
threshold = 500

# time in milliseconds between readings
interval = 30000

while True:
    # turn on sensor (pin 2 connected to Vcc on sensor)
    pin2.write_digital(1)

    # wait for sensor to settle
    sleep(5000)

    # read analog pin 3 (connected to A0 on sensor)
    moist = pin3.read_analog()

    # print reading to console
    print(str(moist))

    # needs watering
    if moist > threshold:
        # show sad face
        display.show(Image.SAD, clear=False)
    else:
        # show happy face
        display.show(Image.HAPPY, clear=False)

    # turn off sensor and sleep to conserve sensor contacts
    pin2.write_digital(0)
    sleep(interval)

# end
Notes
- In our example we have used both a breakout board for the micro:bit and a prototyping breadboard to make the connections. In theory you could connect the sensor directly to the micro:bit using crocodile clips but this is likely to be unreliable in practice.
Further Development
- Add code to query the last reading taken when button A on the micro:bit is pressed.
- Store the last 5 readings and present these as a bar chart using the LEDs on the micro:bit when button B is pressed.
<iframe style="width:120px;height:240px;" marginwidth="0" marginheight="0" scrolling="no" frameborder="0" src="//ws-eu.amazon-adsystem.com/widgets/q?ServiceVersion=20070822&OneJS=1&Operation=GetAdHtml&MarketPlace=GB&source=ac&ref=qf_sp_asin_til&ad_type=product_link&tracking_id=quokkaz-21&marketplace=amazon®ion=GB&placement=B01G8WUGWU&asins=B01G8WUGWU&linkId=7286fb9bde33d624fbe8fb70055b8877&show_border=true&link_opens_in_new_window=true&price_color=333333&title_color=0066c0&bg_color=ffffff"><!-- [et_pb_line_break_holder] --> </iframe>






0 Comments